Click on any picture on this
page for a larger version!
6/11/2005
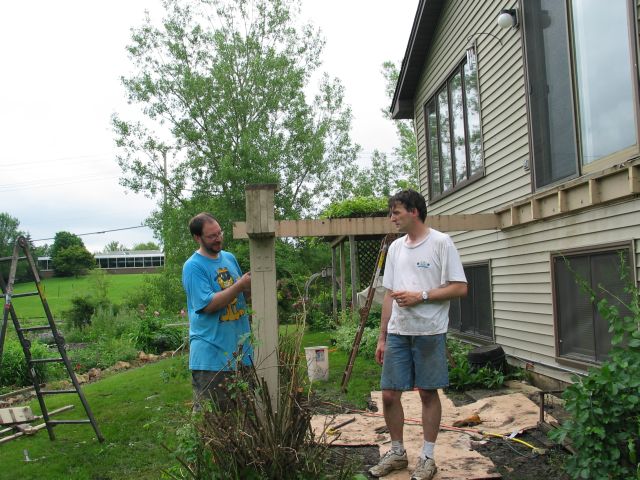
 While
waiting for the official "ok" from the
city in the way of a building permit, we went ahead and demolished the old one one
today. It was pretty amazing how quickly the
old came down: With the help of one of Tim's
coworkers, it only took about 2 hours to go from a
functional deck to a pile of lumber.
While
waiting for the official "ok" from the
city in the way of a building permit, we went ahead and demolished the old one one
today. It was pretty amazing how quickly the
old came down: With the help of one of Tim's
coworkers, it only took about 2 hours to go from a
functional deck to a pile of lumber.
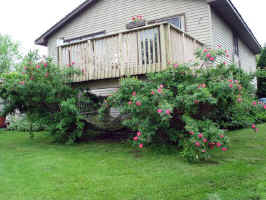
A
casualty of the new deck is the flowering rose
bushes that flanked our old deck.
Unfortunately, they were just beginning to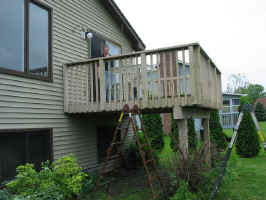 flower
the day we cut them back. At the time of this
writing, they are still intact (but cut back).
However, the placement of these bushes (by the
previous owner) was never ideal. They would
grow up and through the deck, took lots of space on
the ground near the deck edges, and the like.
With the new deck, they would literally be living
totally underneath it, which would not be
ideal. We're not sure if we'll be able to move
them or keep them in the current location... (9/14/05
note: We were able to move them to the other
side of the house. The move was very hard on
them but I think they'll pull through...)
flower
the day we cut them back. At the time of this
writing, they are still intact (but cut back).
However, the placement of these bushes (by the
previous owner) was never ideal. They would
grow up and through the deck, took lots of space on
the ground near the deck edges, and the like.
With the new deck, they would literally be living
totally underneath it, which would not be
ideal. We're not sure if we'll be able to move
them or keep them in the current location... (9/14/05
note: We were able to move them to the other
side of the house. The move was very hard on
them but I think they'll pull through...)
 Dismantling
the railings took only a few minutes.
Dismantling
the railings took only a few minutes.
 Removing
the decking was a little tougher, but still didn't
take all that long. In this picture, we were
down to the main beam and posts, and one final
joist.
Removing
the decking was a little tougher, but still didn't
take all that long. In this picture, we were
down to the main beam and posts, and one final
joist.
 Here's
the completed demolition. We're leaving the
ledger board on until we're ready to put the new one
up, since that would essentially leave an exposed
hole in the siding.
Here's
the completed demolition. We're leaving the
ledger board on until we're ready to put the new one
up, since that would essentially leave an exposed
hole in the siding.
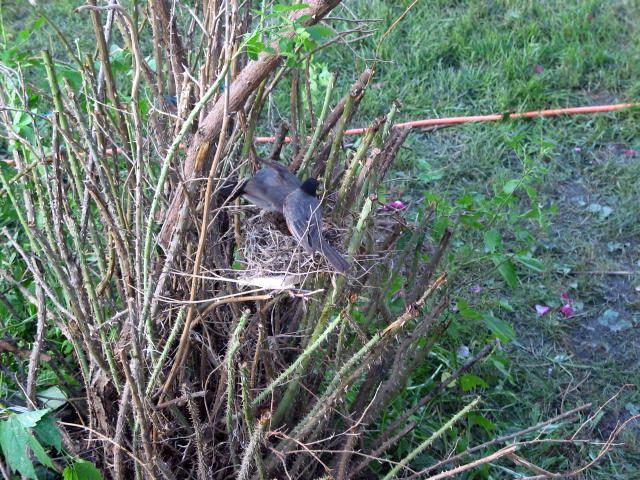
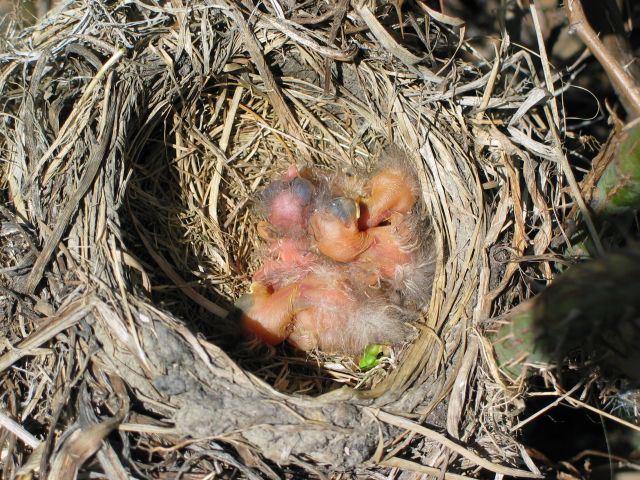
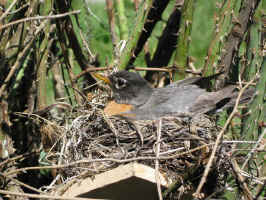
 Even
though we couldn't save the rose bushes (for this
year, anyway), we were able to save a robins nest
that was built under the old deck. The babies
had just hatched and were very tiny. Tim
placed the nest in the rose bush 'stub' directly
below where the nest had been under the deck.
The parents were flying around nervously looking for
it, but eventually found it and appear to be
adapting to the new location.
Even
though we couldn't save the rose bushes (for this
year, anyway), we were able to save a robins nest
that was built under the old deck. The babies
had just hatched and were very tiny. Tim
placed the nest in the rose bush 'stub' directly
below where the nest had been under the deck.
The parents were flying around nervously looking for
it, but eventually found it and appear to be
adapting to the new location.
6/12/2005
 I hauled the huge brush-pile
from the rose bushes to the city yard waste
site. Then I started working on getting rid of
the piles of old deck lumber laying around from
yesterday. I had to cut down a bunch of the
pieces to fit into our little 4x8 trailer. The
trailer soon filled up, and then I ended up cutting
down some of the pieces even further so I can get
them into the back of our SUV so I can haul
everything to the dump in one trip. Tomorrow
we need to make some phone calls to see where it's
all going. I'm keeping a few deck boards for
use as temporary bracing, batter boards, and the
like.
I hauled the huge brush-pile
from the rose bushes to the city yard waste
site. Then I started working on getting rid of
the piles of old deck lumber laying around from
yesterday. I had to cut down a bunch of the
pieces to fit into our little 4x8 trailer. The
trailer soon filled up, and then I ended up cutting
down some of the pieces even further so I can get
them into the back of our SUV so I can haul
everything to the dump in one trip. Tomorrow
we need to make some phone calls to see where it's
all going. I'm keeping a few deck boards for
use as temporary bracing, batter boards, and the
like.
 So far,
continued good news on the robin's nest front -- the
birds (mother, father, and babies) seem to have
adapted well to the new nest location in the
"rose bush stub". I was concerned
that the birds had little shade in their new
location, so I rigged up a piece of cardboard in the
bush to block the intense western sun (the morning
sun shouldn't be as much of a problem). I was
scolded profusely for going near the nest to do
this, and also while working on the woodpile.
Hopefully, the birds will get used to us working
around them and begin to trust us. Heck,
depending on how long the building permit takes, the
babies might
So far,
continued good news on the robin's nest front -- the
birds (mother, father, and babies) seem to have
adapted well to the new nest location in the
"rose bush stub". I was concerned
that the birds had little shade in their new
location, so I rigged up a piece of cardboard in the
bush to block the intense western sun (the morning
sun shouldn't be as much of a problem). I was
scolded profusely for going near the nest to do
this, and also while working on the woodpile.
Hopefully, the birds will get used to us working
around them and begin to trust us. Heck,
depending on how long the building permit takes, the
babies might  even fledge before we get much more
work done.
even fledge before we get much more
work done.
6/22/2005
One step
forward, two steps back was the theme of the past
few days. Yesterday I decided to do the layout
for the posts/footings on the new deck so we can
prepare to dig them. Upon doing this, it
became clear that I really needed to get the new ledger
board hung first, since I could use that as a
reference for all posts, and the new deck is almost
twice as long as the old one.
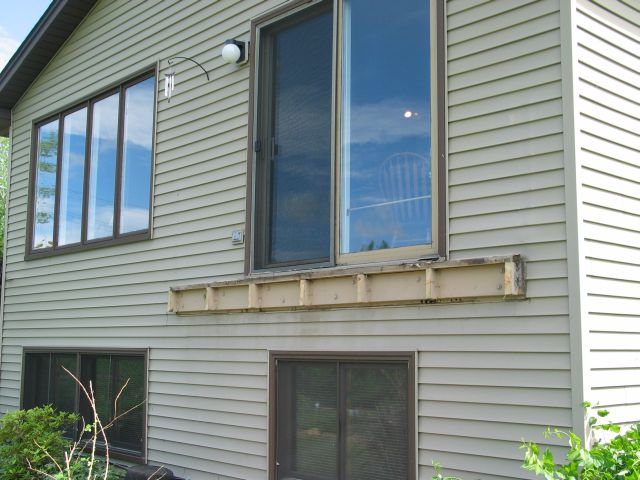
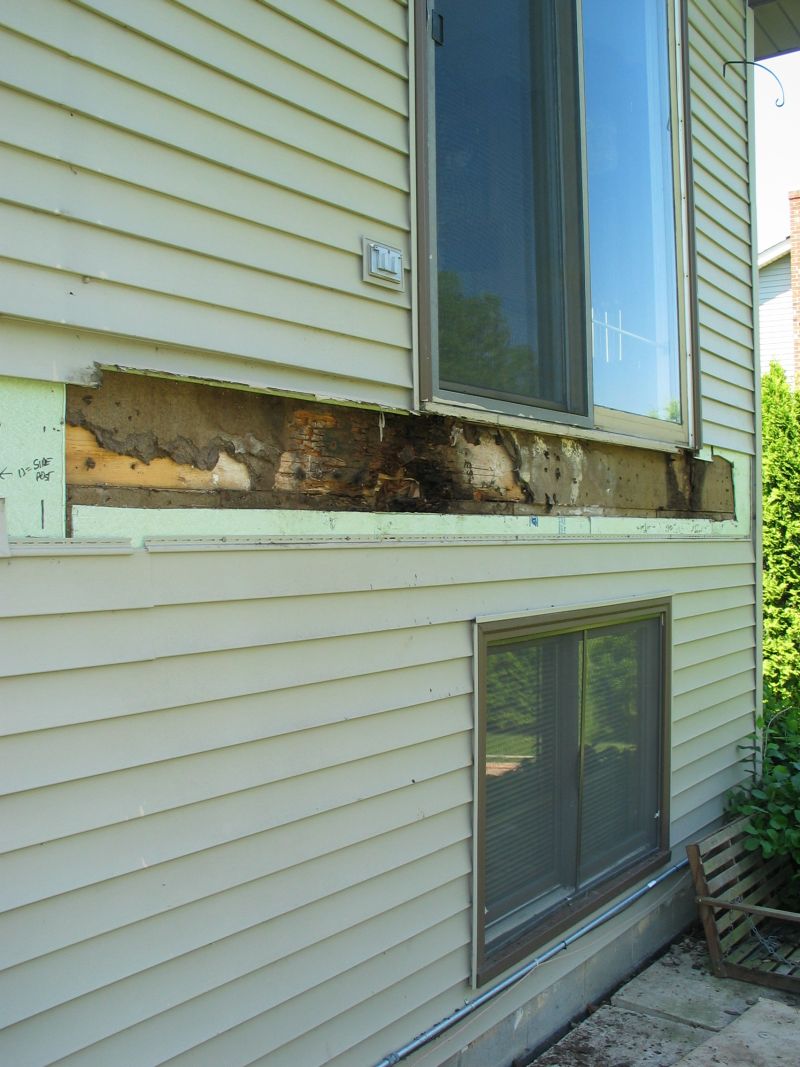
Upon
removing the old ledger board, we found a terrible
site -- water had seeped down beneath our patio
door, for who knows how many years, and completely
rotted out a large chunk of the rim joist supporting
the back of the house, as well as the deck. I
took today off an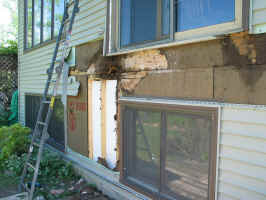 d we ended up tearing siding off
from the rim joist down to the foundation, finding a
lot of rot. After spending
the morning researching the proper way to replace
the rot (and support the house in the meantime, I
(with Cathy's help, when William would allow) cut
out the rot, rebuilt the wall below, and replaced
the bad section of rim joist, providing for a solid
foundation for the house and the new deck.
Tomorrow I need to finish up by replacing a small
portion of sill plate for the wall above the rotten
joist.
d we ended up tearing siding off
from the rim joist down to the foundation, finding a
lot of rot. After spending
the morning researching the proper way to replace
the rot (and support the house in the meantime, I
(with Cathy's help, when William would allow) cut
out the rot, rebuilt the wall below, and replaced
the bad section of rim joist, providing for a solid
foundation for the house and the new deck.
Tomorrow I need to finish up by replacing a small
portion of sill plate for the wall above the rotten
joist.
 6/25/2005
Yesterday,
after work, I proceeded on with the repairs of the
rotted wall. Everything went reasonably well,
but I was in a hurry to get everything closed up and
the siding replaced before dark hit, as some
thunderstorms were predicted. Unfortunately,
haste makes waste, and I stepped down hard on a
board with a nail sticking out -- OUCH! To
make a long story short, I ended up visiting the
doctor this morning and getting a wonderful tetanus
shot, some antibiotics, and it looks like I'll be
doing very little work on the deck this weekend as I
can barely walk right now. Bummer.
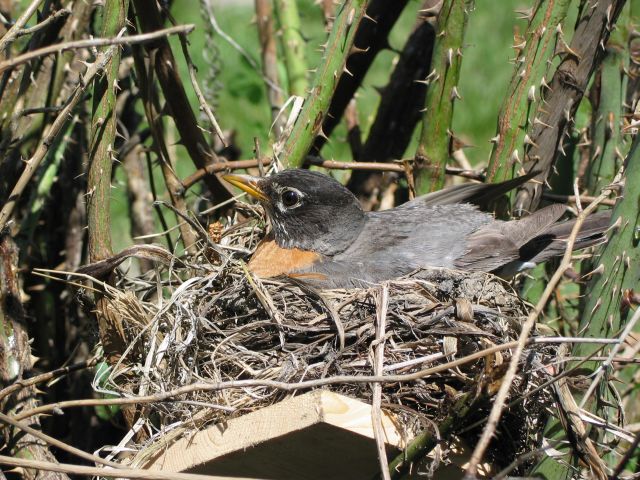
In
case you're wondering about our Robin's nest, that
has a bit of a dramatic story as well. Of the
four original eggs, we ended up with two babies. I'm
not sure if the other two birds died very early on
(there appears to be four in the picture above) but
I never saw more than two the next time I checked
the nest. Of the two remaining birds, they did
very well until a bad thunderstorm on Monday --
which washed out the bottom of their nest. I
came back from work to find them stuck in the
rosebush below -- healthy, but unable to move
much. Fortunately, I had removed a 'backup'
empty nest from the deck when we tore it down -- it
was still available for use by our bird
family. Dislodging the birds from the rose
bush was interesting... The parents just
didn't understand my intent, and the little birds
would cry out when I touched them, and 3 or four
robins dive-bombed me (and Cathy) as we tried to
help. Fortunately we got them removed,
transported to the new nest, and all was well.
On Wednesday, one of them fledged, and yesterday the
second left the nest. I'm glad they seemed to
survive and won't be bothered by us building the new
deck. Hopefully they'll feel welcome and build
a new nest under our new deck next year.
6/27/2005
Well the
foots still sore, but feeling much better.
Unfortunately the weather didn't cooperate today, so
instead we drove up to Lowes and placed our order
for the majority of the deck supplies. It
should be here in a week or so -- in the meantime we
need to pick up a few of the longer boards,
including the ledger board, from Menards as Lowes
didn't carry 20' boards.
We're
still not totally weatherproof, and the hard rains
tonight proved it. I have plastic covering the
section where the ledger is supposed to go, and the
leaky patio door is evidently still leaky as well--
we had some water seep in the lower level (not much,
but enough to make me nervous). I really want
to get the new ledger up and everything flashed and
calked and then I'll feel much better. The
next step is to get the utilities marked and the
footers dug -- then we can have the first
inspection!
7/6/2005
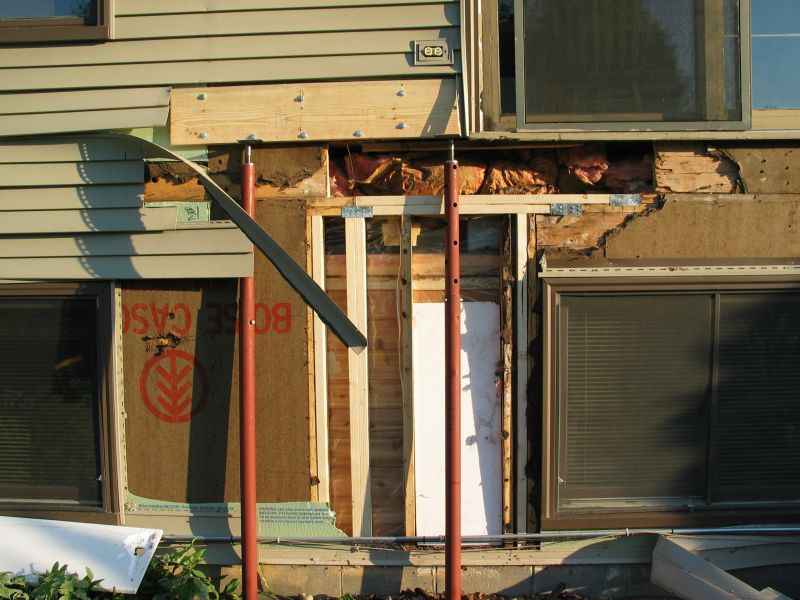
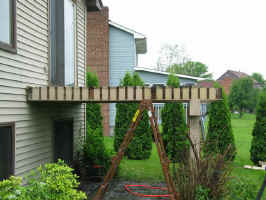
Next we set
out to install the new ledger board. Before
installing the board, we spent a lot of time working
on the flashing for the door and ledger. The
previous deck and door was not 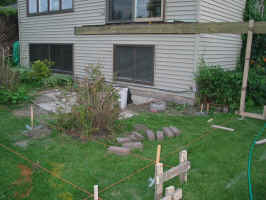 installed
correctly, causing the rot mentioned above. We
won't be replacing the door yet (maybe next year) so
I wanted to do my best at making sure this never
happened again. You can see some of the
flashing in the picture-- we still have siding work
to complete when the decking goes in place.
Putting the actual ledger up went pretty
smoothly considering it was just Cathy and I, and it
was an almost 20' long 2x10" board. We
established the correct height and a level line with
a laser level, lifted the board in place, tacked it temporarily
with some long screws. then attached it permanently
with lag bolts. Our new deck will extend past
the edge of the house by about five feet, and the
overhanging portion will eventually be supported by
poles and beams. For now, we used an old 2x4
to support the edge of the ledger.
installed
correctly, causing the rot mentioned above. We
won't be replacing the door yet (maybe next year) so
I wanted to do my best at making sure this never
happened again. You can see some of the
flashing in the picture-- we still have siding work
to complete when the decking goes in place.
Putting the actual ledger up went pretty
smoothly considering it was just Cathy and I, and it
was an almost 20' long 2x10" board. We
established the correct height and a level line with
a laser level, lifted the board in place, tacked it temporarily
with some long screws. then attached it permanently
with lag bolts. Our new deck will extend past
the edge of the house by about five feet, and the
overhanging portion will eventually be supported by
poles and beams. For now, we used an old 2x4
to support the edge of the ledger.
In
the above picture, you can also see the layout lines
we placed. Once the ledger was in place, we
took careful measurements using the ledger as a
reference, and laid out the locations for all of the
beams, posts, and footers. It was a bit tricky
(working around the rose bush stubs didn't help) but
we finally got it accurate enough.
7/12/2005
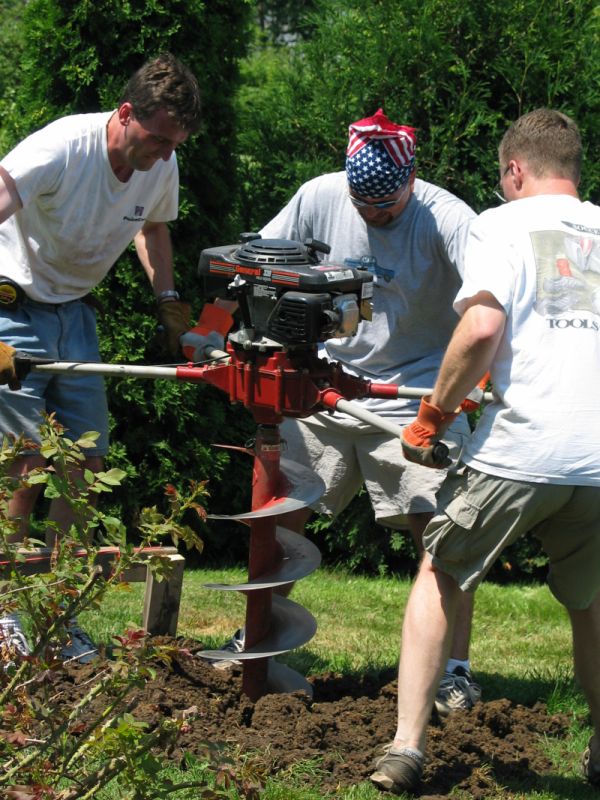
Now that we
had the footing locations marked, th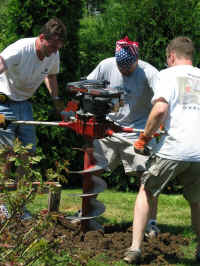 e
next step was to get them dug. Our deck design
requires 7 footings at 12" diameter, and code
requires them to be at least 42" deep.
With this amount of digging, and our hard clay soil,
we decided to rent a power auger. Enlisting
the help of a couple of friends (and choosing a very
hot and muggy Saturday to get it done) we were able
to get them all dug in about 3 hours, taking many
water breaks!
e
next step was to get them dug. Our deck design
requires 7 footings at 12" diameter, and code
requires them to be at least 42" deep.
With this amount of digging, and our hard clay soil,
we decided to rent a power auger. Enlisting
the help of a couple of friends (and choosing a very
hot and muggy Saturday to get it done) we were able
to get them all dug in about 3 hours, taking many
water breaks!
Once
this was complete, we needed to wait for the footing
inspection to happen before proceeding. One
issue we had was that our area has a very high water
table, and most of our holes started filling with
ground water shortly after being dug (some actually
had water in them while digging). Upon the
inspector's advice, we removed all water with a
shop-vac, added several inches of river rock, and
tamped it down well to give the footings a good
base.
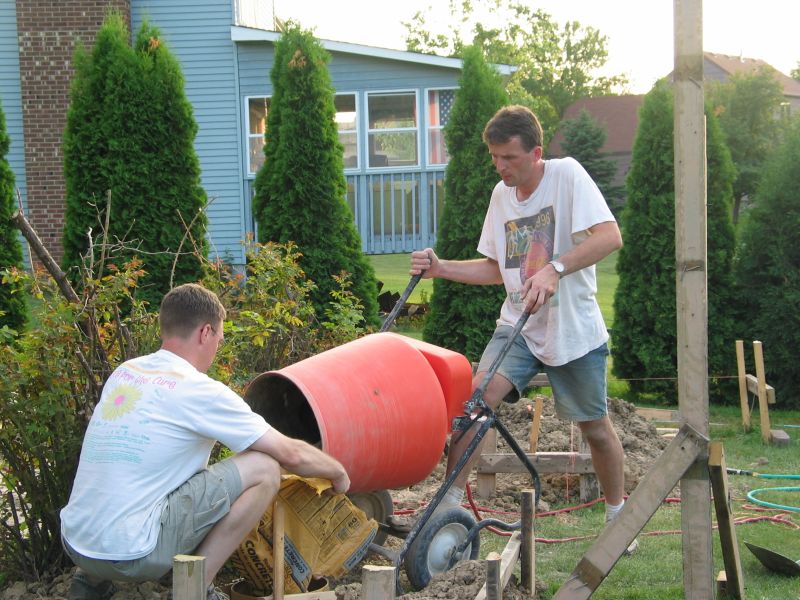
7/13/2005
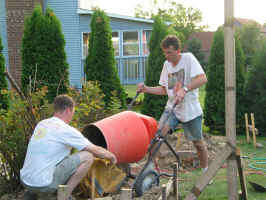 Today,
with yesterday's successful passing of the footing
inspection, we set out to pour the concrete
footings. First we placed the concrete forming
tubes in the holes, supporting them with boards and
leveling them properly, using the layout strings to
make sure they were properly centered. Then,
with some enlisted help and a rented concrete mixer,
we set out to mix and pour about 3500 pounds of dry
concrete mix. The mixer worked very well -- it
was designed so that you could mix, then wheel it up
to the footing and dump it right in. (Note
that the picture looks like we're dumping dry mix in
the hole, but actually Paul was using the empty bag
as a "funnel" to get the wet mix into the
tube). We did
have an issue with one forming tube breaking free of
its boards about 2/3 of the way through the pour --
try as we did we couldn't get it raised back up into
position with all that concrete weight. This
footing will be several inches lower than the
others, but should still work out fine -- we'll be
cutting each post individually anyway. The
work was a bit backbreaking, but the completion of
this was a major milestone -- now we can start
building up!
Today,
with yesterday's successful passing of the footing
inspection, we set out to pour the concrete
footings. First we placed the concrete forming
tubes in the holes, supporting them with boards and
leveling them properly, using the layout strings to
make sure they were properly centered. Then,
with some enlisted help and a rented concrete mixer,
we set out to mix and pour about 3500 pounds of dry
concrete mix. The mixer worked very well -- it
was designed so that you could mix, then wheel it up
to the footing and dump it right in. (Note
that the picture looks like we're dumping dry mix in
the hole, but actually Paul was using the empty bag
as a "funnel" to get the wet mix into the
tube). We did
have an issue with one forming tube breaking free of
its boards about 2/3 of the way through the pour --
try as we did we couldn't get it raised back up into
position with all that concrete weight. This
footing will be several inches lower than the
others, but should still work out fine -- we'll be
cutting each post individually anyway. The
work was a bit backbreaking, but the completion of
this was a major milestone -- now we can start
building up!
7/18/2005
We were out of
town for the weekend, but I did manage to backfill
the footings before we left on Friday and after we
got bac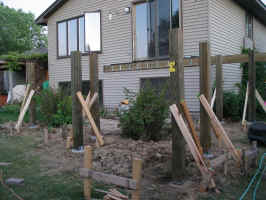 k
Sunday. The clay soil makes for difficult
backfilling -- I'll be working more with a hose
later on, but at least they're pretty good for
now.
k
Sunday. The clay soil makes for difficult
backfilling -- I'll be working more with a hose
later on, but at least they're pretty good for
now.
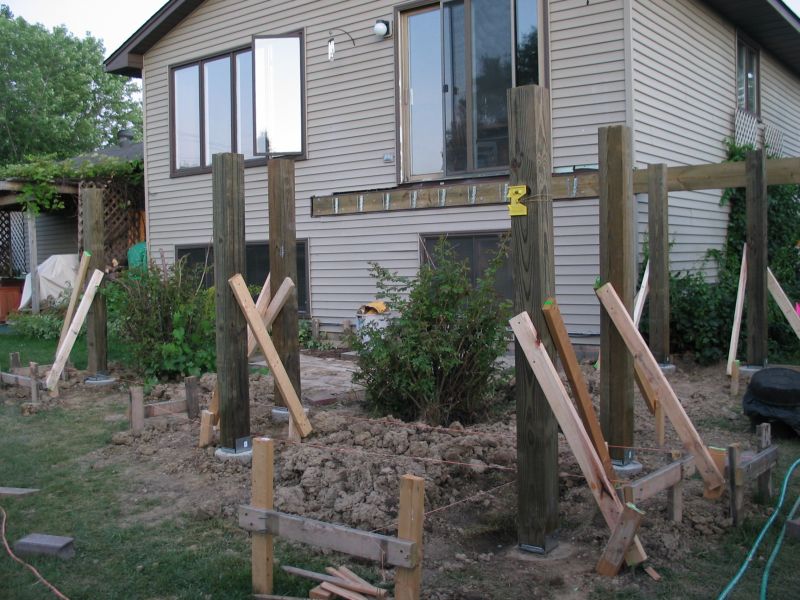
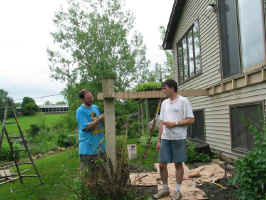
Tonight
after work, I set out to get the posts
installed. Fortunately William was pretty
cooperative and came outside and allowed Cathy to
help out. We positioned the post brackets on
the footings and bolted them down, then cut the
posts to rough size, and installed them one by one,
bracing them temporarily. The layout strings
again played an important role in this task, and a
post level was our constant companion.
As
you might also see from the picture, I also was able
to start installing the joist hangers.
Finally, we used our laser level to mark the correct
height on all of the posts. The next task will
be to cut the posts off, and start installing the
beams. It sure is nice to finally have
something (besides the ledger board) above ground!
7/23/2005
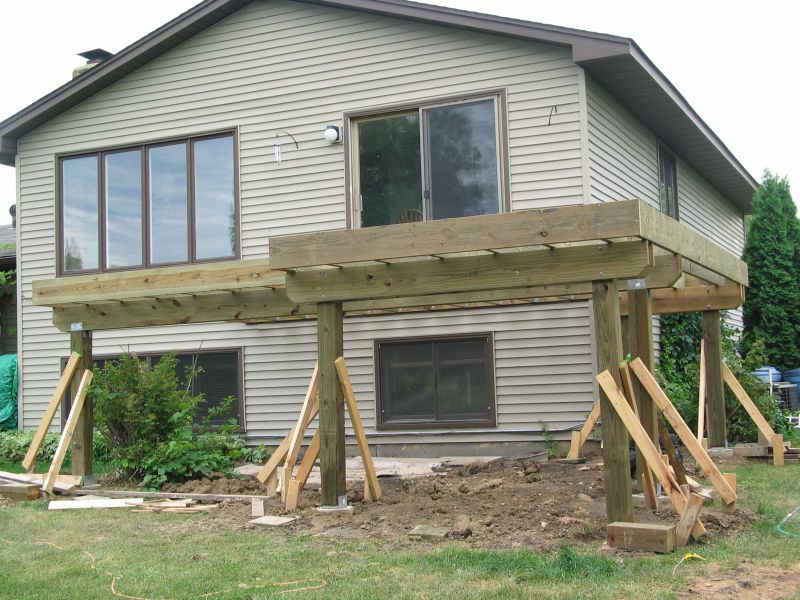
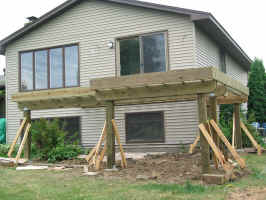 Lots
of visible work happened this week! Once we
had the posts installed, we started work on the
beams. Our deck plan includes three
beams. Two are relatively small, and hold up
the stairway landing and the area where the ledger
board extends beyond the house. The third beam
extends the 19'6" length of the entire
deck. The small beams were easily installed by
us, but the large one is made up of 3 2x10's and was
quite heavy, so we had to recruit some
help.
Lots
of visible work happened this week! Once we
had the posts installed, we started work on the
beams. Our deck plan includes three
beams. Two are relatively small, and hold up
the stairway landing and the area where the ledger
board extends beyond the house. The third beam
extends the 19'6" length of the entire
deck. The small beams were easily installed by
us, but the large one is made up of 3 2x10's and was
quite heavy, so we had to recruit some
help.
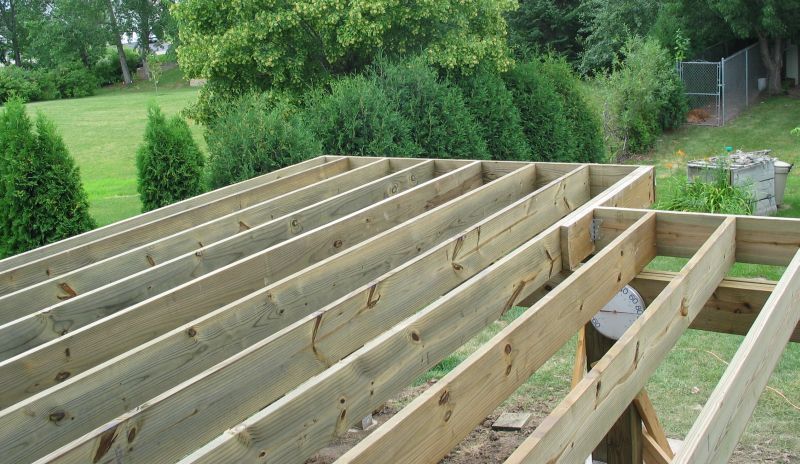
The help came
on yesterday, and the beam was placed rather
quickly. Once it 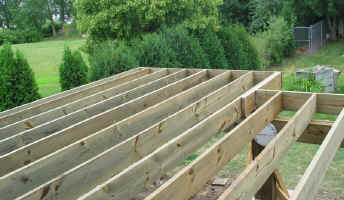 was
secured in place, we immediately started placing the
joists over the beams. We finished up today,
and now all of the joist framing is complete!
It's pretty amazing how quickly this most visible
part of our construction went. Our next task
will be working on the railing posts (which must be
placed before the decking), and also starting on
work for the stairway/landing area.
was
secured in place, we immediately started placing the
joists over the beams. We finished up today,
and now all of the joist framing is complete!
It's pretty amazing how quickly this most visible
part of our construction went. Our next task
will be working on the railing posts (which must be
placed before the decking), and also starting on
work for the stairway/landing area.
To continue on
with Page 2 of the deck pictures, please Click
Here.
This page was last
updated on Friday, March 28, 2008